Project
Project management involves simple registration of information. The information includes Payer, Project name, Owner, Description, Tasks and so on.
Fields marked with an asterisk (*) are mandatory fields. Projects can be searched by Payer, Project name or Owner. Entering the beginning of a name or a number is enough to get results.
If no search criterion is given, all products will be displayed.
Hours can be recorded to the project from the list by clicking the clock ![]() icon in the list. By clicking the
icon in the list. By clicking the ![]() icon, detailed information about the project will be displayed, including worked hours and products.
icon, detailed information about the project will be displayed, including worked hours and products.
If company has defined dimensions in Admin > File administration > Dimensions control, new fields for dimensions will also be displayed.
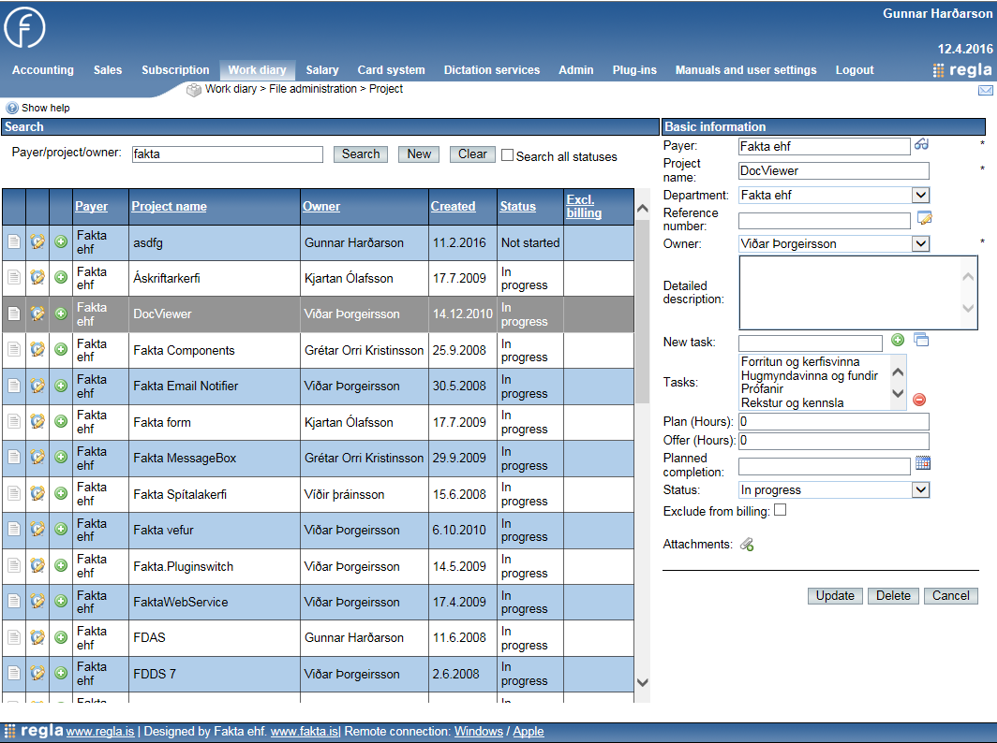
The search consists of a search field and three buttons. If a search criterion is entered into the search field and the Search button clicked, the system will automatically search for projects matching the search criterion. If a project or projects are found, it will be displayed below the search area.
On the right-hand side, detailed information about the selected product will be shown. If no product was found, the system will enter into the edit mode.
It will also automatically insert the search text either into the Product name field.
You can also enter the same edit mode by clicking the New button. The Clear button will clear both the search field and the results.
When the box of Search all statuses is not selected, the search will only cover projects that are in the status Not started or In progress.
Basic information
The basic information area has two different modes: creation mode and edit mode.
The only difference between these two is that the creation mode has a Create and Cancel button, while the edit mode has Update,Delete and Cancel button.
Payer, Project name, and Owner of the product are the only required fields.
All other fields are optional.
Payer
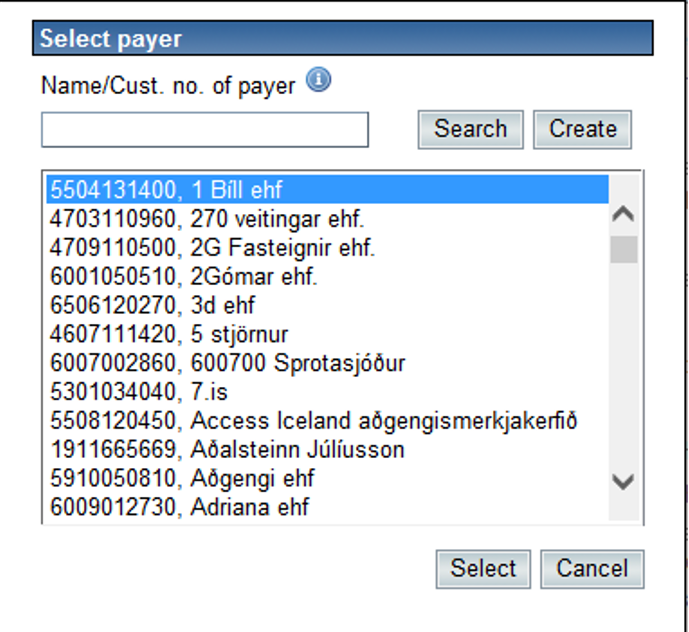
To create a project, a payer needs to be selected first. A payer can be selected either by searching for a part of or the whole name or Customer number. You can also click the glasses icon on the right side to see a detailed search results in a small window. If only one payer is found, the system will automatically select the payer and inserts it into the Payer field.
If the system finds more than one payer the small window will appear displaying the search results, as shown below. In this window the payer can be chosen by clicking the payer and then click the Select button. If no payer is found, you can enter a new search criterion and click the Search button or create a new payer by clicking the New button.
Project name
Please enter a name here to make the project identifiable.
Reference number
A reference number can be used to link the project information with, for example, some device that has its unique number. If the reference number does not exist you will be shown a small window showing the registration of relevant detailed information. This form can also be displayed by clicking the
![]() icon. Projects then can be searched by using reference numbers in Queries and also in project. In the reference number windows, projects related to this reference number can be shown by clicking the
icon. Projects then can be searched by using reference numbers in Queries and also in project. In the reference number windows, projects related to this reference number can be shown by clicking the ![]() icon.
icon.
Also, reference number can be beforehand imported to the system under Admin>File administration>Import. This will help companies that have contract regarding reparation of specific devices.

Owner
Please enter the person who is responsible for the project here.
Description
You can write the project description here. The description can only be seen and edited in this view.
Task
Projects can be divided into Tasks. Tasks can be added by entering a name for the task in the New task field and confirm by clicking the green plus icon or by using predefined tasks.
To be able to use predefined tasks, you can define first at the Predefined task page (see chapter 6). To add a predefined task to the project, please click the green check mark icon.
A window will then be displayed showing a list of available predefined tasks.
You can choose one or more tasks from the list and then click the Add button is clicked. To select more than one task, please hold the Ctrl key on the keyboard while selecting the tasks.
If you would like to remove a task from a project, please click
![]() button on the right side.
button on the right side.
You can change the name of tasks defined on projects be selecting the task in the list and register new name in New Task and then click
![]() button.
button.
Plan
You could enter the estimated hours the project will last here. This planned hour is informative but will not be used as reference in the system.
Offer
You could enter the available hours for the project here. This available hour is informative but will not be used as reference in the system.
Planned completion date
You could enter the planned completion date of the project here. This planned completion date is informative but will not be used as reference in the system.
Status
A project can have one of four different statuses. The different statuses are:
- Canceled
- Not started
- In progress
- Completed
- Allocation confirmed
- Approved by customer
- Allocation rejected
- Work completed
- Allocation request
You cannot enter hours (planned or available) for a project that has the status Cancelled or Completed.
If a project has the status Not started, its status will change to In progress when the first work hour registration is made for that project.
Exclude from billing
If checked this project is excluded when selected for billing under “Work diary>Billing>Charge for work hours and products”.
This is suitable for example when contract with customer for special amount for the whole project regardless of how many hours registered and which products.
Attachment
Attachment can be enclosed with a project and even with different hour registrations for the same project. The attachments that are assigned to hour registration entries are also displayed when you view the project attachment. To add an attachment to the project, please click the
![]() button. To view the projects attachments, please click the
button. To view the projects attachments, please click the ![]() button.
button.
When adding an attachment, a little window will be displayed for browsing and choosing a file and then save it into Regla.
If attachments have been assigned to any entry on that project, a list of all entries that have attachments is displayed when you click the ![]() icon. Otherwise the system will pop up a window to assist you upload attachment.
icon. Otherwise the system will pop up a window to assist you upload attachment.
The back button
If a project is created from the Hour registration page or the Customers page, a Back button is added below the Basic information area along with other buttons.
This button allows you to return to the page you came from, bringing the last project created with him to that page.