Hour and product registration
Hour registration involves a simple record of work hours and whether they will be billed or not.
The emphasis is to always keep clear the projects payer and also efficient registration of different projects successively.
First, a project needs to be selected and then a task if applicable and then a registration area appears where the actual registration takes place.
On the top of the display hour registration or product registration is selected.
Find available employee
Clicking
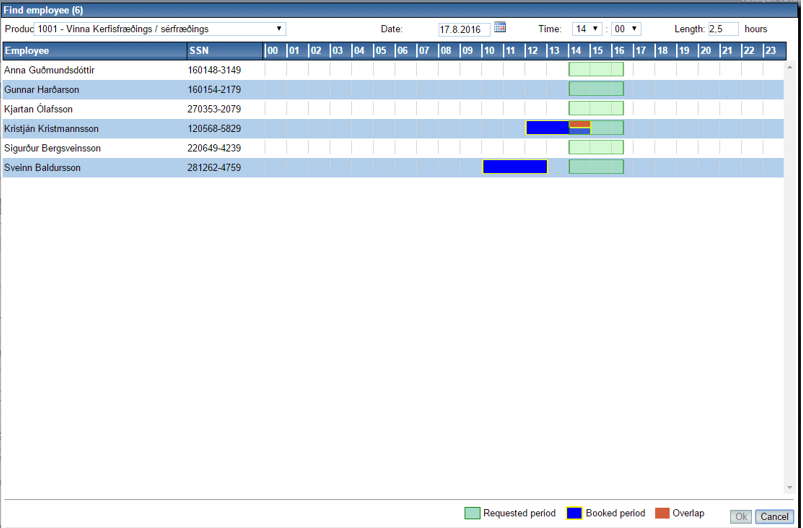
![]() brings up window for finding an employee free at specific time and with a specific ability.
brings up window for finding an employee free at specific time and with a specific ability.
Select project/task
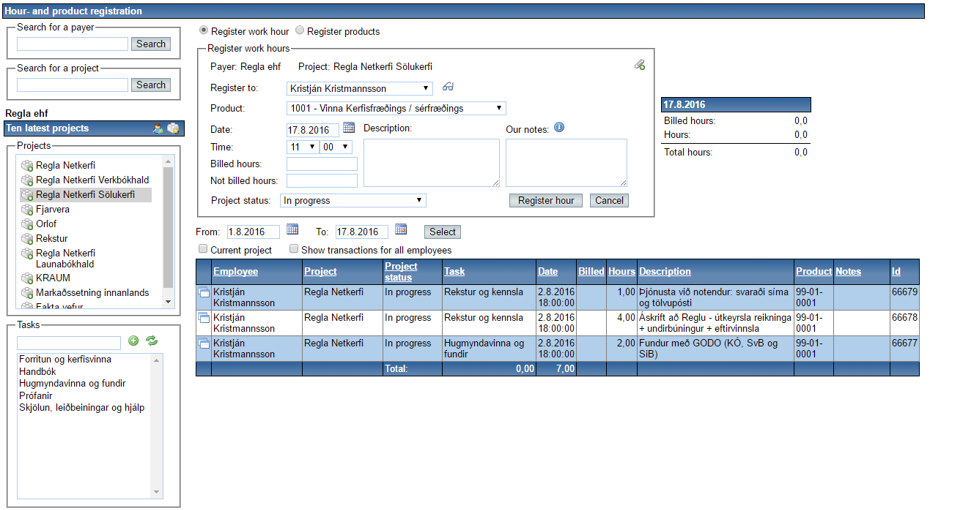
There are three ways to select a project and record the hours it needs. You can choose payers from the list and then a list of all projects belonging to that payer will be displayed.
Another way is to search for the project. Another way is to select the project independent from the payer.
And at last you can select project from Ten latest projects list (please note that if you have never used this function or recorded project before, the Ten latest projectsoption is not available).
On the top left is a search area. You could choose to search for payers by entering full name or part of name of the payer and then click the Search button.
To display all payers, you can keep the field blank and click Search button. As before mentioned you can also search directly in similar ways for projects independent of payers.
After selecting payers, a list of projects will be displayed below the payer name. You could click the
![]() icon to go back to payer’s list.
icon to go back to payer’s list.
When a project is selected from the project list, all tasks related to the selected project will be displayed. If no tasks exist, an empty task list is displayed.
You could select a task for more details by clicking the specific task.
If a task has been chosen but you would like to go back to the upper menu, the
![]() button above the list could be pressed to clear the task selection.
button above the list could be pressed to clear the task selection.
A new task can also be created from here by simply entering the task name in the input field above the task list and click the green plus icon
![]()
After an employee input hour information in the system, he will get access to a list of the 10 latest projects he has recorded.
This list is automatically generated and will help you speed up the record process.
If the project is not found in the 10 latest projects list, you can still search a payer to select project. The 10 latest projects list can be displayed by clicking the ![]() icon.
icon.
A project for selected payer can be created by clicking
![]() in the title bar of the list. Identical buttons are available to the left of each line in the list of payers and projects.
in the title bar of the list. Identical buttons are available to the left of each line in the list of payers and projects.
That button is a shortcut for creating a project.
Hour registration
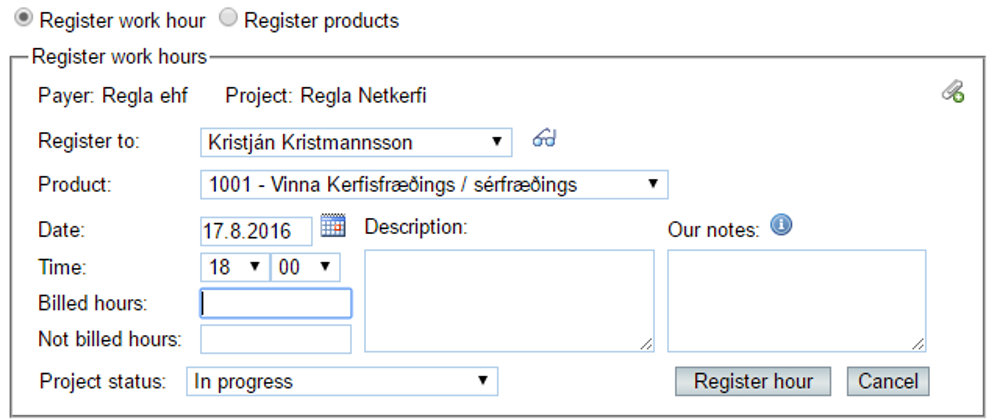
When a project has been selected, payer’s name, an input field and tasks (if there is any) are displayed as shown below.
You can also record the work hour for other employee if it is permissible by the company administrator.
If using of dimension is defined for the work diary system you can select the possible dimensions from selection list here.
Hourly rate is selected form selection list if employee has defined for him more than one.
You could record the date and hours a project last here. If the date you choose is not today, then this date will be marked in red.
The default value for registration is the current date. If another date is chosen, the new date will become the default date. To enter a date, you can the calendar icon and select.
Below the date field are two fields, Billed hours and Hours (it means the hour not paid by the customer). If you enter information in both of fields, two identical entries will be created, one is for the Billed hours and another one for other Hours. Please Note that the amount you enter could be decimal number, for example 1,5.
Finally, there are the fields Description and Our notes. You could enter a simple description regarding the work hour for this project. When an invoice is sent to the payer, this description will be shown. Our notes field is for notes or comments that better clarify the hour (e.g. a delay in the work or some other description that not relevant to payer). Our notes will not be displayed on any invoices.
You can change project status by selecting from list Project Status.
Total work hours
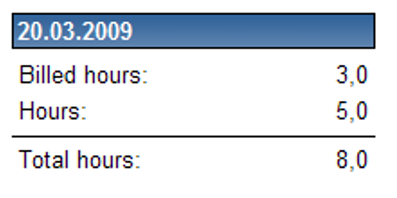
On the right side of the table you can see a summary of total work hours for the chosen date.
The total work hours is calculated by adding billed hours and hours together.
Hour registration list
After recording hour, you can search entries to view, edit, copy or delete records. The list will display entries within a given period.
The default period is the current month. To view a specific period, you can enter dates into the From and To fields or choose from a calendar and then click the Search button.
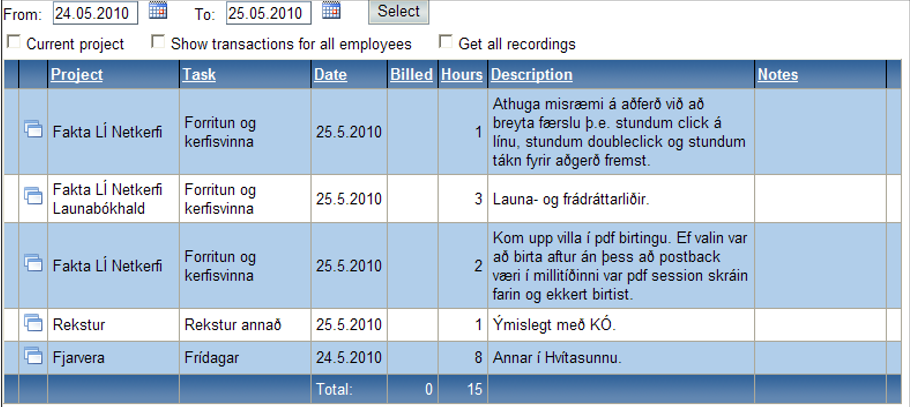
For each entry in the list there are buttons in the first columns.
The
![]() button can copy the entry to the record field, the
button can copy the entry to the record field, the ![]() button shows an invoice if entry has been billed and the
button shows an invoice if entry has been billed and the ![]() button allows the user to view the attachments that have been connected to the entry. The last two buttons are only available if entry has been billed or if attachments are connected with the entry beforehand.
button allows the user to view the attachments that have been connected to the entry. The last two buttons are only available if entry has been billed or if attachments are connected with the entry beforehand.
To modify an entry, you need to click the line to enter edit mode.
The main difference between the edit mode and the record mode is that in edit mode an entry can be Updated or Deleted and the paper clip icon allows the user to view the entries connected attachments.
When an entry is copied, all the information except the date (would be the current date) will be automatically filled into the input fields.
Product registration
In addition to recording work hours for projects, the products related to the project can also be recorded here.
By clicking Register products on the top, the page will be navigated to product record.

The process of recording product is very similar to hour recording.